top of page

NEWS

our latest updates

Updated: Oct 14, 2024

Every AREC Media Station from versions 2.6 and newer comes with an inbuilt way to control it — the graphical user interface, shortened to GUI. We covered this interface in detail in the very first ADENA Hack, and mentioned additions to it in subsequent posts. GUI can be opened and closed easily by left-clicking anywhere away from it with a computer mouse or by touching on a USB-connected interactive display. You can also use the dedicated hide/show buttons in the corners of the GUI. Starting from firmware versions 2.11 and on stations with the MCU version 4.3 or 4.4, it is now also possible to completely disable the GUI until it is needed again. To do so, open the “Administrator” web page of your station, go to “Media I/O” -> “Display”. You will find two settings dedicated to this: “OSD Menu'' and “OSD Menu - Playback Video”. Toggling off “OSD Menu” will shut down the GUI until this option is toggled on. Toggling off only “OSD Menu - Playback Video” will keep the GUI, but remove the playback feature from it. If you want to keep the GUI available, but remove the ability for your operators to see previously recorded videos, make sure to toggle off this option.

As of May 2024, the option to completely disable the GUI is available on LS-2, LS-200, LS-300, LS-400, LS-410, LS-860 and KL-3T models, with plans to include it in LS-110 and LS-US2 in the coming months. Would you like to know more about this or other AREC Media Station features? Make sure to reach out to us at www.a-dena.com and we will be happy to arrange a call with you!

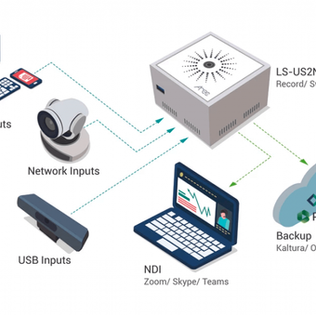
You may know that NDI exists in two main versions - Full NDI and NDI|HX. There are certain differences between these two versions - for example, NDI|HX sends compressed data and uses far less bandwidth. The differences make the two versions incompatible and typically devices would only support one version of NDI. AREC Media Stations with NDI support, including LS-860N and LS-US2N, were built to support NDI|HX, and so typically devices using standard NDI cannot be connected to them. However, there is a way to convert them via NDI Bridge, an essential tool that is included in the NDI package. To use it, simply download and install the latest version of NDI Tools from https://www.newtek.com/


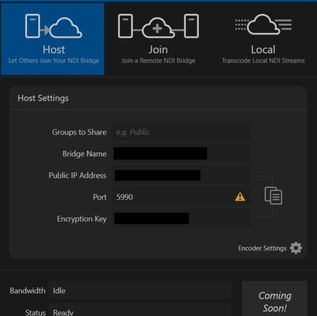
Open the NDI Tools and select Bridge. It will open with a page similar to this:

While in this guide we focus on using the NDI Bridge to convert standard NDI to NDI|HX, the app can also be used to make your NDI sources available over the Internet and to connect NDI sources from other networks. To convert NDI signals, however, click on ‘Local’. Start by adjusting the name of your bridged connections in the ‘Bridge Name’ field. Next, click on ‘Encoder Settings’ and change the output mode to ‘NDI|HX’. All AREC stations, except the upcoming LS-410, use only h.264 video compression, so make sure to select it. You must also select the stream’s bitrate in ‘Quality’. Since 4Mbit is sufficient for Full HD, you can select ‘Low’. After adjusting these settings, press ‘Start’, and you will be able to see a list of bridged connections appear in your network. To use these bridged connections on AREC stations, open the ‘Administrator’ web page of your station, click on ‘Media I/O’ -> ‘Network Device Manager’ and scan for new devices. If your station is in the same network as your computer running NDI Bridge, you will be able to see the NDI|HX bridged connections appear in the list.

One important thing to note is that bridged connections use the computer running the app as a tunnel. Whenever another device is trying to pull an NDI source from it, its network traffic load will grow. You can monitor how much bandwidth the computer is consuming in the field called ‘Bandwidth’.

If you would like to know more about how you can use NDI or other technologies with AREC, please contact us at www.a-dena.com and we will be happy to assist you.


There are currently 8 Media Station models in the LS/KL series. All of these devices share core features, such as recording, streaming, automatic backup, calendar scheduling, video layout, overlay, background controls and more. But there are certain differences that can help you choose the right model for your needs. We’ve previously covered some of these unique differences in the ADENA Hack №54, and so this time we are diving deeper into the topic.


To begin with, we can divide the Media Stations into three categories - 2, 3, and 4 video

channel models. By channels here we mean the maximum simultaneous number of video sources that a Media Station can work with. 2 channel models are LS-US2(N), LS-110, LS-2, and LS-200, 3 channel models are LS-300 and KL-3T, whereas 4 channel models are LS-400 and LS-860(N). Within these categories, these models are different from each other in terms of their AV inputs and outputs, as well as certain unique features.


For example, we’ve highlighted the unique feature of LS-110 in ADENA Hack №33. LS-US2’s unique feature is its ability to work with USB video inputs and also an optional NDI-HX licence. LS-2 and LS-200 are both rack-mounted stations, with the LS-2 being a more budget model. As for the 3 channel models, KL-3T is defined by its inbuilt touchscreen, which makes it perfect for placements on lecterns, podiums, and mobile usage. Lastly, in the 4 channel category, LS-860 is defined by its multiple HDMI and 3.5mm line/mic inputs, optional NDI-HX licence, and inclusion of a specially integrated accessory called ARECast.


Precise differences between the Media Station models can be examined via our comparison table. Take a look at it by clicking here, or access it anytime through our main page www.a-dena.com -> Resources -> Catalogues -> AREC Media Station Comparison Chart. And if you would like to know more about any of our products, please contact us and we will be happy to assist you.

bottom of page