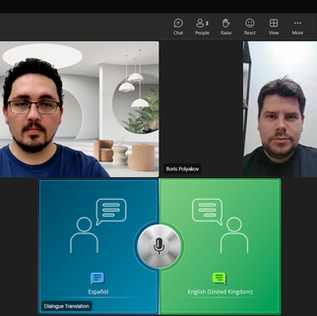
Our two-way speech-to-text translation and transcription station, the KS-CC2, can make communication easier in different scenarios, including hotels, hospitals, universities, and many others. Importantly, this device can also be used in online settings, and this time we will focus on conferencing rooms, showing you how you can use KS-CC2 in Teams, Zoom, and other similar and popular videoconferencing platforms.

To begin with, keep in mind that the KS-CC2 model was designed to accept audio via two USB Type A ports. These ports are colour-coded for simplicity, with one colour (green) standing for one language input, and the other (blue) standing for the other. Given that the inputs must be USB, you may need adapters to connect the KS-CC2 to computers running conferencing applications, hardware conferencing devices, or DSPs.

To give an example, we will use our KS-CC2 with Voicemeeter Banana, a free Windows software audio mixer with the necessary functions to route audio. Our computer running this application is connected to the KS-CC2 via a RADA HDMI-to-USB Bridge. The Bridge converts the HDMI output of the computer into USB, which allows us to connect it as an audio input to KS-CC2. With the cables connected, all that is left to do is to configure Voicemeeter. One of the audio outputs should be your speakers, headphones, or another device that you use to listen for conference calls. Make sure to enable this output for conferencing audio. Your other output should be the KS-CC2. It will most likely be recognised as CBOX – this is the default way in which AREC devices are recognised when connected as audio inputs/outputs. Simply allow conferencing audio to be outputted there. Don’t forget to output your own microphone to conferencing only, for the other side to hear you, and you are good to go.

At this stage, conferencing participants can already be transcribed and translated. If you want your audio input to be transcribed and translated too, simply connect it to the other audio input of the KS-CC2. In our example, we are using RADA Duo Wireless Microphones for this. When you are ready, simply press the microphone button on the KS-CC2 to begin.
The example above resolves the audio part of using KS-CC2 in meetings, but a few more steps are required to display the translated/transcribed dialogue in a meeting. One of the ways would be to connect KS-CC2 as another participant in a conferencing call – using another computer or conferencing hardware and setting the KS-CC2 as a webcam. Alternatively, it can be shared as ‘content’ in a meeting – for that, you will need to connect the HDMI output of the KS-CC2 to the conferencing, either directly or via HDMI-to-USB converters like the RADA Bridge. The advantage of this connection is that there are no ‘fake’ participants, and the dialogue could be easier to see this way. Another way to show KS-CC2 would be to use a camera and a big screen. However, our recommendation is to use an AREC Media Station – this is because with a Media Station, you will be able to dynamically switch between showing the KS-CC2, computer slides, cameras, and other video sources, add custom graphics and other effects to make your video stand out. Moreover, using a Media Station to show KS-CC2 also allows you to effectively display it for the local audience, thanks to loop-through outputs present on every Media Station.
And that’s all there is to it! If you would like to know more about the KS-CC2 or check how it works live, let us know at www.a-dena.com, and we can arrange a demonstration when it is convenient for you. Also, if you want to know more about Voicemeeter Banana, we have a video walkthrough describing its configuration and use with AREC devices here: https://youtu.be/4tY86NJO7h0.